Why Physical Separation Matters in Transit
Accidents in shipping rarely come from a single big impact; they come from a chain of small movements—micro-shifts, rubbing, and tipping. When products share the same cavity, they collide, scuff, and chip. Midway through this problem sits a simple answer: dividers that stop items from touching and keep loads balanced. In many packaging lines, Box Divider Inserts act as the quiet barrier that controls motion, limits abrasion, and preserves finish quality from the packing table to the customer’s hands.
Impact and Vibration Control
Dividers create individual cells that limit momentum. Each item has less room to accelerate, so shocks from drops and conveyor bumps lose force before they reach fragile edges. The walls of each cell distribute pressure across a larger area, reducing point loads on corners, rims, and caps. This steadying effect is especially helpful for glass, ceramics, and filled jars that are prone to rim chips and neck cracks.
Surface Protection and Abrasion Limits
Even when products survive impacts, rubbing can dull labels, scratch coatings, and mark clear windows. A divider sets a hard boundary so finishes avoid contact. With the right surface treatment—smooth paperboard, coated kraft, or thin laminated liners—friction drops further. Labels stay legible, product faces stay clean, and returns caused by “scratched on arrival” complaints decline.
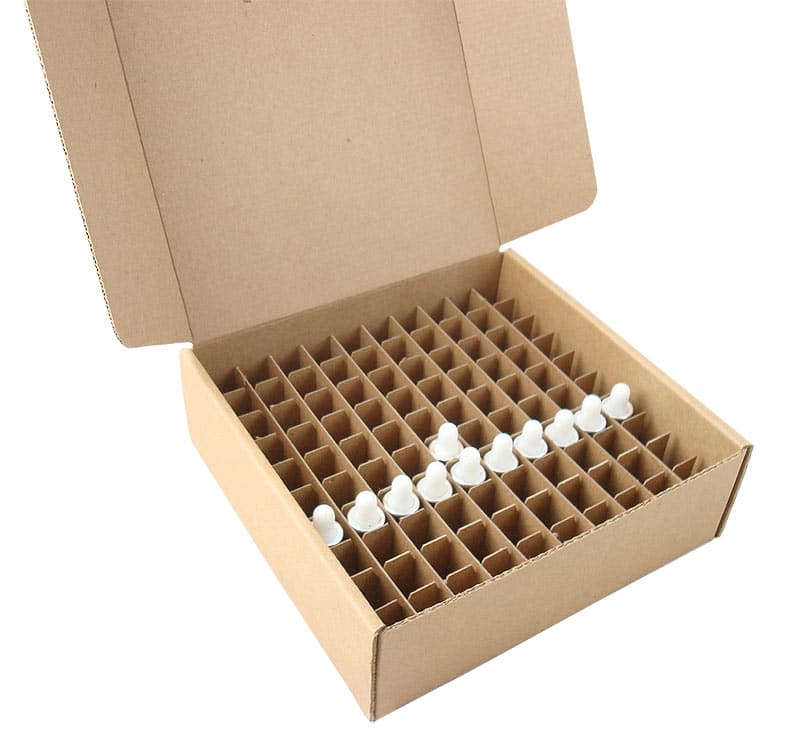
Box Divider Inserts – Materials and Formats
A divider is more than a grid. Material, flute direction, and joint style decide how well it resists crush, humidity, and repetitive handling. The correct format also speeds packing, which cuts labor minutes during peak dispatch.
Paperboard and Corrugated Options
Paperboard grids suit lightweight skincare, sachets, and confectionery. They fold flat, pop open quickly, and present well when the inner pack is visible. For heavier or bulkier items, micro-flute (E or F) adds stiffness without taking much internal space. Move to B-flute or double-wall when cell walls must carry weight or when pallets face longer trips and rougher hubs. Edge rounding on the top of each cell improves packer comfort and reduces label scuffing during insertion.
Foam, Pulp, and Hybrid Structures
Where surface sensitivity is high—polished caps, lacquered tins, coated droppers—thin foam or molded pulp can line the grid to absorb micro-vibration. Hybrid designs combine a corrugated frame for shape with a pulp or foam liner for cushioning. This pairing keeps costs controlled while providing a softer contact surface, useful in cosmetics and premium food categories.
Designing for Load, Fit, and Workflow
Good divider design starts with a clear picture of the item’s geometry, weight, and center of gravity. Fit the product—not just the box—so each cell supports edges and bears loads at planned points.
Sizing Tolerances and Clearances
Aim for snug, not tight. A small clearance—often 2–4 mm per side—prevents rattle while allowing quick insertion. For glass or brittle plastics, avoid tight corners that concentrate stress; use small radii on cell cutouts. If caps or closures carry weight, specify reinforcement tabs or a double-ply top rail so pressure never rests on a fragile lip.
Assembly Speed and Packing Efficiency
Dividers that require complex weaving add seconds per unit. Choose pre-assembled crosses or glued grids that spring into shape. Clear notch marks, printed fold guides, and asymmetry cues (front/back) lower training time. When SKUs vary slightly, design one master grid with removable fingers or a thin adapter sleeve to fit multiple bottle diameters without a full retool.
Testing, Compliance, and Quality Checks
Lab tests confirm what a divider can handle before it meets real freight. Documentation keeps results repeatable across lots and suppliers.
Transport Simulation and Drop Testing
Use vibration tables and drop sequences that reflect actual lanes—courier, air, or line-haul. Test the full pack: outer carton, divider, void fill (if any), and product. Check for rim chips, label rub, cap loosening, and corner crush after cycles. If damage appears, adjust flute direction, add a top rail, or tighten cell clearance rather than jumping straight to thicker outer cartons.
Food, Cosmetic, and Fragile Goods Standards
For food and personal care, specify materials that meet relevant contact and migration rules where needed. Odor neutrality matters; request low-odor inks and adhesives, especially for enclosed packs. For fragile goods, include an internal SOP: acceptable cosmetic marks, torque checks for caps, and pass/fail photos so warehouse teams judge outcomes consistently.
Cost, Sustainability, and Print Planning
A strong divider need not be heavy or wasteful. Balanced specifications can protect products while supporting budget and environmental goals.
Cost Controls and SKU Consolidation
Material drives cost more than almost anything else. Right-size the flute and board grade to the tested load rather than overspecifying. Consolidate part numbers by standardizing footprints and changing only cell width via knife adjustments. For seasonal spikes, run larger batches to reduce setup charges and hold flat-packed grids that assemble in seconds during peak demand.
Recycling, Sourcing, and Clear Signals
Paper-based grids are widely recyclable; keep plastics minimal. When visibility is required, consider cellulose windows or coated paper liners instead of PET where regulations and performance allow. Print clear instructions on the shipper or inner panel—“Separate grid from outer carton. Recycle with paper”—to support customer compliance. If you use recycled content, note the percentage on B2B spec sheets so procurement teams can verify claims.
Implementation With Suppliers and Operations Teams
Early collaboration avoids revisions later. Share real measurements, real weights, and real transport scenarios—not estimates—so samples reflect the job at hand.
Dielines, Samples, and Approval Gates
Request dielines with flute direction and cell geometry. Ask for three sample rounds: flat fit mockup, assembled grid in master carton, and a small pilot batch for live packing. Record insertion time per unit, cell deformation after packing 50 units, and any label rub marks. Approval should include signed photos of acceptable fit and a log of the test sequence used.
Training, Storage, and Line Integration
Provide a one-page packer guide with photos: orientation arrows, insertion order, and notes for oversized caps. Store grids flat in a dry area and avoid stacking heavy pallets on edges that would crease top rails. On the line, position the divider close to the product source so operators minimize reach and reduce small drops while loading.
Final Pointers for Decision-Makers
Every divider project benefits from a short, precise brief and a measured test plan. Keep the focus on load path, motion control, and operator time at the line.
What to Specify Up Front
State product dimensions with tolerance, unit weight, and the expected shipping lane. Define board grade, flute, cell clearance target, and the number of items per layer. Include a photo of the product family, highlight fragile zones, and list acceptable cosmetic marks. Set a labeled weight limit and an assembly time goal per unit so operations can assess throughput.
Why a Good Grid Saves More Than It Costs
A well-designed divider reduces returns, protects branding on labels, and shortens packing time during the busiest weeks. Damage avoidance preserves margin; fewer repacks and credits mean steadier inventory and cleaner customer feedback. When the grid holds items steady, the entire shipment travels calmer, and products arrive as intended.
